Archive for December, 2011

Magnetic Spin Toys

December 30, 2011

I became interested in Magnetic Spin Toys after hearing Chris Danforth from the University of Vermont talk about chaotic systems.  His discussion and demonstration of the unpredictability of a double pendulum made me wonder what it would be like to explore systems with large numbers of magnetic spin toys, like those mentioned at the top of this page. I tried to purchase some from Amazon and eBay, but they are no longer available, so I decided to manufacture some and play with them. I searched for and found the patent for the original toy, which you can find here.

The original design employs a complex injection molded plastic part that was beyond my capabilities.  I considered attempting a 3D design for the part, and fabricating it at the Vermont FabLab with a 3D printer, but decided to go low tech at first.

I purchased a hole saw and used that to cut disks out of a sheet of 1/4 inch plastic.  I glued magnets to the circumference of the disks and pressed a brass tube through the center of the disks for horizontal stabilization.  I epoxied a brass rod to a ring magnet and dropped a similar ring magnet onto the rod, oriented so that the two magnets would repel.  I then dropped the plastic disks onto the rods, so that the opposing magnets would serve as a magnetic bearing, as discussed in the patent.

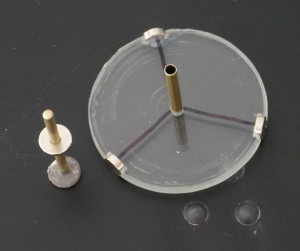
This picture shows the component parts of an individual magnetic spin toy.  The brass rod is shown in the lower left.  It is epoxied to the ring magnet at the bottom of the rod; the magnet in the middle of the rod is held suspended by the opposing magnetic force.  The plastic disk is on the right, with the three magnets and the brass tube:

When assembled, they look like this:

I use a steel sheet (actually, a spare music stand) as a base for the magnetic spin toys.  This allows me to reposition them quickly and easily.

You can see videos of all of this as follows:

Assembly of components and demonstration of magnetic bearing and spinning

Two magnetic spin toys interacting

Three magnetic spin toys interacting

Four magnetic spin toys interacting

Four magnetic spin toys interacting in a square array

Four magnetic spin toys interacting in a rhomboidal array

Demonstration of magnetic interaction with distant magnetic spin toys

You might find it interesting to download the videos (I use DownloadHelper in FireFox) and step through the videos one frame at a time (I use KMPlayer) to watch how the disks respond to each other.  I will probably color code the magnets for future videos.

My original thought was to create an array of interacting spinners, one of which could be driven by a hidden microprocessor-controlled motor.  The microprocessor would be set up to drive the motor in varying patterns to ensure that the array never stopped.  I considered linear or curved lines of spinners, perhaps attached to loops.  It turns out that arranging the spinners in tightly packed arrays also works well.  The patent demonstrates that the axes of the spinners do not need to be parallel: you can arrange for the spinners to be at angles to each other, so it would be possible to arrange them on the surface of a hemisphere.  My use of a steel surface for testing could be expanded into using a curved surface for the “final” system.  So.  Lots of things to explore.
DIY Heated Dual Towel Rack

December 30, 2011

My nearly-new house was mis-designed so that the master bathroom had no windows that would open.  In the summer, this makes it difficult for towels to dry, so I added a heated towel rack.  When my girlfriend moved in, and chose to use two towels at one time, I needed a Plan B.

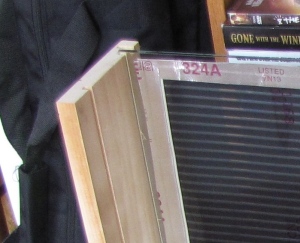
I looked around for heated towel racks, but they are either ridiculously expensive, cheaply made, or of the wrong size for my particular room.  I explored heating technologies, and found a product that is intended to be used to heat the bottoms of reptile tanks.  It comes in a 11 inch wide roll of heavy-duty plastic, with a power buss along each edge.  When you attach 110 V A/C (wall voltage) to the two power busses, the heating resistors in the sheet produce 20 watts per linear foot.  You can cut the roll to any length you wish (I used 2 foot lengths) to get as much or as little heat as you require.  The material looks like this:

You can find out more about this product, and purchase it from, www.reptilebasics.com.

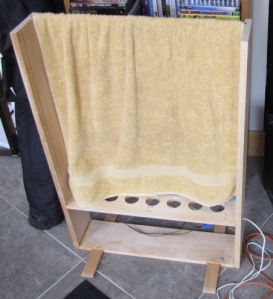
I decided to buy some pieces of glass, mount (tape) the plastic material to the glass, and then drape the towels over the glass.  I cut some slots in some wood and dropped the glass into the slots.  The first prototype looked like this:

This shows how the wood was slotted:

This shows the bottom.  I intended to have the two towel warmers side by side, so I cut holes to allow air to circulate between the two towels.  At this point, only one heating plate was installed:

This shows the first prototype with the towel removed:

You can see the two 2-foot long pieces of heating material, taped to the glass with aluminum tape; two other pieces of heating material were used on the other side. The blue masking tape was used to reduce the chance that someone would accidentally brush up against the 110 V A/C connections.

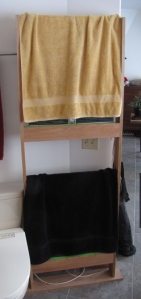
We used this for a week or two. The heat produced was great for drying the towels, but this particular design has a number of problems.  For one thing, the two heating plates would have been too close to easily allow the towels to be draped into the space between the plates, and expanding that space made the unit take up too much floor space.  For another, it consumed more power than I wanted to use continuously (320 watts).  I considered about 5 different alternate designs, and chose one with the second towel directly above the first. This is how it looks, installed:

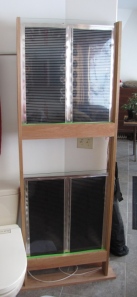
Notice the space between the towels, to allow access to the wall switches.  This is one reason that I decided to build a custom system. This is what it looks like with the towels removed:

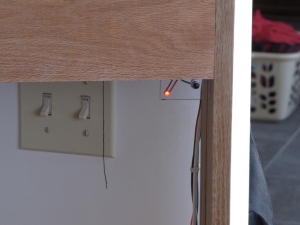
I solved the power consumption problem by purchasing an ELK-960 delay timer, and modifying it so that the maximum time increased from 1 hour to 3 hours.  When you push a button, the timer and heaters come on for 3 hours, and then shut off.   You can see the button and activity LED here:

The bulk of the wiring is hidden behind the bottom panel.  You can see the 12 V power supply for the ELK board on the right, with the ELK board in the middle:

At some point, I may replace the wire nuts with soldered joints, and then enclose the solder in silicone caulk.  Not up to code, but safe enough for careful use by two adults. I attached the top of the rack to the wall with two lengths of chain, to ensure that it does not topple over.