I’ve been frustrated because the kick pedal on my Roland HD-1 only functions intermittently. I listed the HD-1 on CraigsList, and a guy came over to check it out, but he was not satisfied with the reliability of the pedal. I called Roland to see about replacing the resistive sensor in the pedal, but they only sell the complete pedal assembly, at $220. Since the current value of my HD-1 is approximately $300, this makes no sense at all.
I discovered that you can purchase an equivalent/replacement resistor from Pololu (http://www.pololu.com/catalog/product/1696) or under $10 which works just fine. If you want to repair your HD-1, this is the procedure.
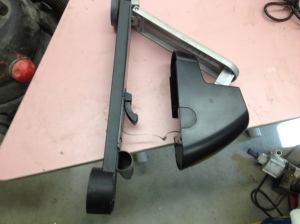
Tilt the HD-1 on its side, unplug the kick, and remove the kick assembly, as shown below:
Remove the four phillips screws and one hex screw:
This will separate the black housing from the base:
The spring connecting the silver pedal and the black housing may come loose or fall out: don’t worry about it. In fact, you may want to remove it to make what follows easier.
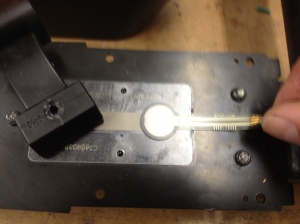
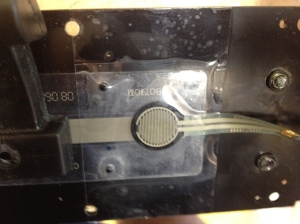
You will see the black rubber piece that is used to transfer the pedal force onto the resistor. The resistor is at the end of the plastic ribbon, and is sandwiched between two pieces of clear plastic. You can just cut the plastic ribbon clean across the clear plastic pieces.
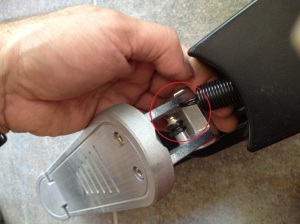
Note that the black rubber piece may end up inside the black metal housing. The plastic stud that holds the rubber in place was originally part of the black metal housing, but snapped off when I removed the housing. No big deal, since it is pressed in place when the housing is replaced.
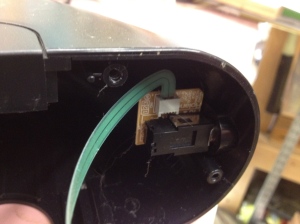
The other end of the plastic strip/ribbon goes into the black metal housing. You can remove the black metal heel plate to see what is going on inside:
Pull the plastic ribbon from the connector and discard it. Remove the 1/4″ plug using a set of socket wrenches.
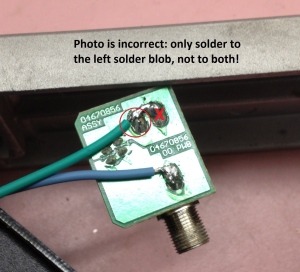
Get two light gauge wires about a foot long and twist them into a pair. Solder one end of each wire to the resistor:
Solder the other two ends to the PC board attached to the 1/4″ jack. Note that the photo is incorrect: only solder the green wire to the first (left) of the two solder connections:
Put the 1/4″ connector back into the black metal housing:
Replace the black metal heel:
Place the new resistor sensor on top of the plastic sheet where the old one was, centering it on the end of the white strip coming from the rubber bumper. Tape it in place with clear plastic shipping tape. Placement may be different with your pedal.
Re-attach the black metal housing using the five screws and then attach the entire pedal assembly back on to the HD-1. If the spring that connects the pedal to the housing came loose, it is easy to re-attach. Just put the open end of the spring into the pedal and hook it on the receiver:








November 24, 2012 at 2:11 pm |
Great post…it got me thinking and i have now incorporated a force sensing resistor behind the rubber pad of my Roland KD8 kick pad. I can now use this with my HD1 kit without any further mods to the existing brain – although I tend to use superior drummer. Thanks for the inspiration thought!
June 12, 2020 at 3:54 pm |
Hi Darren,i’m from Italy…sorry for my bad english; i read your post cause i’m very interested in what u did…i know is a very old post,but maybe u can help me:can u explain me how did u incorporate the resistor in your KD8 pad?it would be great if u had also some pics showing the job…i ‘d like to build something to use a “normal” pedal triggering the sensor in my old HD-1…thanks in advance…bye,Ale.
June 12, 2020 at 8:02 pm
Ale:
It has been a LONG time since I had the HD-1, and my memory for details about that kit is gone. I cannot find any pictures of the drums that would be helpful to you.
I suggest that you play around with piezo sensors, connecting them to the HD-1 and then tapping on them, to see if you can get the HD-1 to trigger. If you can, then try to mount the piezos in a convenient way.
Maybe someone else will see this and have better suggestions for you.
Good luck!
Jon
November 30, 2012 at 10:37 am |
I have question, When I opened kick pedal – I noticed the small plastic stick holding the rubber is broken and can you please help me out to fix it.
Thank in advance
November 30, 2012 at 5:35 pm |
Do you mean the stick I’ve circled?
I believe that it was broken at the top on mine, too. I would try to find a plastic rod of the appropriate diameter and drill and tap the inside so that it is similar to the part that you have. Sorry that I cannot be more helpful
December 1, 2012 at 12:30 am
Yes, This is the one. I will try to find something similar.
Thanks for your reply.
April 19, 2015 at 12:30 am
If someone are planning to first open pedal, be really CAREFUL. If you follow exactly the instructions of this page you will BREAK this pin that hold the rubber. You need to completely unscrew the inner side of the pedal, and you will find a hidden screw that holds the plastic cover. After remove that, the rubber part will be attached to the plastic cover, not the aluminum base!! Be careful!
April 19, 2015 at 5:56 pm
Thanks to Andre for this clarification!
February 25, 2013 at 1:39 pm |
Dear mr. Bondy.
Interesting stuff. I have a HD1 myself. Have you ever considered hooking up for example the Roland TD8 V-kick to the HD1 ? Do you think it would be possible ?.I really like my HD1 as overall value for money, but I mis the feeling of a real beater for the bassdrum.
Kind regards,
Piet.vandeweghe@gmail.com
February 25, 2013 at 6:39 pm |
The HD1 controller uses a different approach to sensing the two HD1 foot pedals than do the main line of Roland drum controllers. Rather than using piezos or position sensors, they uses variable resistance pads. This means that the regular kicks do not work directly with the HD1, because the signals that the HD1 is expecting do not come from the other kicks.
If you pass the HD1’s MIDI output to another drum controller, you can then attach a regular kick to the second controller. A bit of a kludge, but those controllers are inexpensive, and the resulting kit is more flexible and extendable than the HD1 by itself.
February 25, 2013 at 7:14 pm
Thanks for you quick response !!
That’s a real pity…
I fear this also mean that, if I would connect another module like the TD4 to the HD1’s snare, toms, cymbals, hi-hat and kick, the module would not recognize the signals it gets from the HD1’s hardware ?
Or certainly not for the hi-hat … 😦
Could you maybe also give an example of what you call ‘another drum controller’ ? Because that would then maybe be the way to go.
Thanks a lot !
February 25, 2013 at 10:29 pm |
By “another drum controller” I meant something like a TD-4. You connect the MIDI Out from the HD1 to the MIDI In on the TD-4, and use the HD1 to process the signals for the HD1 hardware. You then connect your regular Roland Kick to the TD-4, and use the output from the TD-4 to go to your headphones or speakers. I’ve done this: it works quite well.
February 25, 2013 at 11:22 pm |
Mmmmm… that’s an idea… thx !
March 14, 2013 at 9:29 pm |
hi just wondering can we use alesis RealHead Kick Pad instead of hd-1 bass drum which I hate.
March 15, 2013 at 12:20 pm |
Hi Andaz,
I was facing the same issue; the HD1 bass kick was no go good. Then, after consulting Roland, I added some grease (vaseline, or some not-to-solid leather grease) on the bottom of iron “anvil” that is screwed on to the kick pedal, and cleaned away the dust and the old fat on the rubber lip, which is pushed down by the anvil.
After that, the kick sounded louder and tighter, to the extent that I decided to wait a little longer with buying another module and another kick.
So maybe that could help you to…
Apart from that, all Mr. Bondy’s tips are very good as well of course 🙂
March 14, 2013 at 10:50 pm |
I don’t know anything about the Alesis RealKick Pad. If it is like most piezo drum pads, then you cannot use it with the HD-1 controller in the bass drum position. You could buy a cheap piezo-to-midi trigger and then pass the midi on to the HD-1, I think. Or get a different brain, attach the RealKick to the new brain, and send all of the HD-1 signals out to the new brain via midi.
March 15, 2013 at 8:58 pm |
Thanks for the reply. I found out on YouTube about modifying bass drum with piezo transducer. I could not figure out if that works at all or not because he did not tested at all. All he said was that worked..
Link down
May 3, 2013 at 5:37 pm |
Hi, To avoid damage, it is wise to loosen all screws of the bass pedal. Then you can clean everything and put new grease on the sensor. Until now, it works!
May 19, 2013 at 11:04 am |
In a similar way that you replaced the resistive transducer, could it not be replaced with a piezo transducer to allow it to trigger say a TD4 module?
May 19, 2013 at 5:30 pm |
I think you could do this, but then you would not be able to use it to trigger the HD-1.
May 21, 2013 at 8:32 pm |
yamaha ku 100 is compatible with roland hd 1?
May 22, 2013 at 1:42 am |
Sorry, but I have no idea.
September 3, 2013 at 12:32 pm |
Jon, thanks for a useful tutorial – it motivated me to open my HD-1’s kick pedal and clean it 🙂 I’ve bought it second-hand and had to use a lot of force to make the kick sound right. I’ve also used silicon spray to grease the rubber and now everything works perfectly 🙂
December 1, 2013 at 4:25 am |
Hi there,
Thanks a lot for this post, really useful!
I have just bought a used hd-1 and both of my pedals are crap.
The bass drum operates only when kicked quite hard, and it is very silent. Maybe my headphone is not really good at low freqs, but I guess it should be much louder. The hihat pedal is also not closing properly, if I push it hard its closed, but once I raise it, it does not close by a normal foot-on-pedal, just on a hard step-on, like when kicking a bass drum. I will try to clean it and lubricate with silicone spray, and hope for the best. I hope I wont need to change the FSRs on them…
Another issue is the whole frame has quite a much free play, it is moving quite a lot back and forth, particularly when using the pedals. As seen on youtube videos, everything is moving a few centimeters when playing normal intensity, but mine is moving about 5-10 centimeters, which is quite funny. The mounts are solid, every screw is in place and tightened properly, nothing is broken.
What else could cause this? Anyone experienced something like this?
Otherwise its a great kit, the snare drum is just awesome, the toms and cymbals are OK too, no problem with them.
December 1, 2013 at 4:58 pm |
OK, I have just taken a closer look of my pedals, and saw that they are full of dirt and dust, which made me glad, that hopefully all they need is a cleaning. So I just hook off the spring, blown out with compressed air inside, and wipe around the rubber with a silicone sprayed towel, and it all fixed up, and works just as expected!! 🙂
Also noticed that the middle rubber “foot” of the set, that is in line with the brain, was set way too high, so I lowered it and now it stopped swinging around when playing on the pedals.
Now I think it is almost perfect, I still have a minor issue with the hi-hat pedal, it is not opening fast enough, somewhat a little sticky for me. I connected the hi-hat connector to the bass drum pedal, that works perfectly. So I may need to disassemble the left pedal for further cleaning, but it is really minor issue, not that critical. Or at least not for my very beginning of drumming after 20 years. 🙂
December 4, 2013 at 4:05 am |
Today I have totally disassembled the pedal, pulled down the top foil from the sensor, and noticed that the silicone grease went between the two foils that caused the resistor not working reliably.
After making it all nice clean and dry, I put it together, but it still was not so good. This time it not closed fast enough when stepped on the pedal, just after the next beat, or so. Then I realized that it works all right if I push the rubber by hand, so this newer problem was a mechanical one, the metal part that is pushing the rubber was too dry and it sticks on the rubber. After applying a thin layer of oil on the metal part, my hihat pedal immediately fixed and works totally awesome!!! 🙂
Another note for those who broke the stick that holds the rubber in place: it is not enough to unscrew that four philips screw, because there is a hidden bolt under the metal basement, so you have to unscrew all the 5 hex bolts, remove the whole metal basement from the bottom of the pedal, and then you will see that hidden bolt that goes into that stick which broke for some folks here.
I hope it will help for some! 🙂
Cheers,
fmarton
December 14, 2013 at 8:09 pm |
Hi there. Im having problems with my kick too. Its too quiet. The little rubber boot. Should it be dry or have some oil or grease on it? And which oil or grease. Also should the metal piece have some on the bottom of it or should it be clean.
December 14, 2013 at 8:52 pm |
I think that the issue is that the rubber part move smoothly over the resistor/sensor. I think you probably can use just about any lubricant (silicone spray, perhaps petroleum jelly); I would not use WD-40 (it is not a lubricant).
December 14, 2013 at 11:06 pm
Wow…that did it. Actually I just used some coconut hair grease. Now the kick is nice and fat. Thanks!!!
December 15, 2013 at 12:57 am |
Grease ! Make sure you remove the dust, then add grease at the bottom of the metal “hammer”. I used vaseline once, which worked fine, and another time i used “mitosyl”, which is a very fatty diaper grease LOL, works too
February 5, 2014 at 9:54 am |
My drummer uses an HD-1 set up. 1 of his cymbals stopped working so I replaced it for him with a Roland CY-6. Works like a charm. He was also having issues with his pedals recently which sucked at gigs because the hi-hat isn’t loud enough for him to help keep time with it and the kick was just absent in the mix.
I brought them home and took them apart and cleaned them up real good and used some lubricant on them. I also place a couple of strips of tap directly over the resistor on each with a little fold on the ends.
WOW! This kit is like new again. Kick is solid and the hi-hat works like new. He was getting ready to drop the coin on a new HD-1 or even an HD-2 but now… no need, Huge thanks to all of you for the tips! We rock on!
February 5, 2014 at 5:54 pm |
So glad that you found this thread, and that it was useful to you!
March 23, 2014 at 1:50 pm |
Just did a two-seconds-maintenance job on the Bass Kick. No need to unscrewing anything, just lifting the pedal up a bit, wiping the metal part and rubber part with a bit of toilet paper, applying some baby-but-cream on the metal part, and bingo, kick goes 3 times as loud again. Amazing how such a little thing can have such an effect…
February 7, 2014 at 11:02 am |
Anyone else have trouble with their HD3 kick pedal double triggering?
February 16, 2014 at 3:03 am |
Me too bought a used Hd-1 set. (my long time dream, too many years..) And the pedals was not working too well. First I opened them and cleaned all the dust, that helped a bit.
Then I found this site and as advised, I applied some “baby-butt/ cow-nipple grease or whatever it was 🙂 to the pedal metal beaters and WOW! What a difference! The kick and hi-hat works like as they should.
And I did not grease the sensors. i don’t think that’s necessary.
And, the plastic stick that holds the rubber piece, Mine was as broken as yours, so I believe it was like that originally and none of you have broken it really.
I must thank all the people who shared their information here, It was very useful for me!
March 2, 2014 at 7:46 pm |
Knowing my success rate at this kind of stuff I was able to easily save the old strip. Just unplug it from the board and gently pry up the square plastic and carefully pull the original strip off. My new repair works but now I got more than I asked for because it double triggers sometimes! (LOL) but it does work and I can put the old one back if I want,
March 13, 2014 at 7:38 pm |
I coated the rubber foot piece that contacts the electric strip with vasaline and put it in the microwave for 30 seconds and it came out AMAZINGLY plyable and works perfect now!
February 15, 2015 at 1:00 am |
Hi Mike, does that mean the double triggering stopped?
March 18, 2014 at 1:00 am |
valeu irmão….a pra isso que serve a net . vou montar no meu pedal .
March 24, 2014 at 1:38 am |
Hey Jon,
thanks for the good instruction 🙂 I did exactly what you wrote and it worked good (I had never ever done something like that in my life!!). It was not as good as the old one in the beginning – I needed more force to close the hihat – but I later changed the position of the new resistor sensor (I put it a bit closer to that rubber thing) and now it works perfectly! From time to time you have to grease the downside of the pedals to ensure a smooth playing, but that’s okay. So thank you very much sir, you saved me 200 bucks!
Btw: My plastic stick was broken, too. I guess it’s just badly manufactured. And: you don’t have to grease the resistor, just the downside of the pedals (every 3 months) and it will be as in the beginning.
April 28, 2014 at 7:19 pm |
Hi,
I just came across this post while trying to fix (what a coincidence!) the bass drum pedal of my HD1. But, what I would really like to ask, is if you or anyone could tell me the sizes of the screws that hold the foot pipes and the vertical part. The four ones… I lost them and would like to get another four so that the structure is more stable.
Thank you!
Joao
April 28, 2014 at 9:00 pm |
Sorry, but I no longer have the HD1 here. Maybe some others will know. You could grab an assortment of screws from a hardware store and test them for fit.
Jon
April 29, 2014 at 11:10 pm |
Hi, Joao!
If you mean the allen-head bolts, that hold the vertical part, they are M5x10mm bolts with a 5mm tall heads. There are 2 of them for each pedal.
If you think something else, tell me what you are thinking of! 🙂
Cheers,
marci
May 1, 2014 at 1:39 am
marci, jon, thanx a lot to both of you! already got some and they fit perfect.
cheers
J
July 23, 2014 at 3:28 pm |
WOW – great post. I do have two questions though. First can I use a sensor like bigger sensor like the Interlink FSR406 as well and second, you just soldered only ONE cable to the FSR and the jack? That works?
July 23, 2014 at 3:54 pm |
Other sensors might fit physically, and might be as sensitive to the kick, but I have not tested them.
Not sure what you mean by one cable and the FSR. I soldered two wires from the jack to the sensor. The cable from the drum controller goes into the jack.
September 29, 2014 at 3:54 am |
Great post! It inspired me to open the pedal and see what was happening inside. But after doing it a couple of times, I notice the following:
(1) As someone said before, the instructions are not quite right. First, you have to release the small rubber foot from the pedal. This will reveal a hidden hex bolt. Then, you have to unscrew the 5 hex bolts, and release the metal base with the tube. This will reveal a hidden phillips bolt. Finally, unscrew the 5 phillips bolts to release the base metal plate. If you don’t follow this sequence, you will brake the pin that holds the rubber piece.
(2) It’s not wise to open the pedal just for cleaning. Some of the bolts are screwed to the plastic housing, and the screw holes may get stripped if you open the pedal too often.
(3) The cleaning/greasing trick worked for me for about an year or so, but lately, it hasn’t being working anymore. So, after opening both pedals a couple of times and thinking a lot, I came to the conclusion that the problem is not the sensor, but the rubber part. According to internet, when rubber gets old, it looses its flexibility. It’s a irreversible process, so the only real solution would be to change the old rubber part for a new one. As I can’t buy a new rubber part, I used a trick I found on the net. I heated the rubber part in boiling water for about a minute. It worked, the rubber is flexible again and the pedal is working as new. I just wonder how long the trick will last (weeks? months?).
September 30, 2014 at 10:23 am |
Hi Murakami,
Thanks a lot for the great tip with the boiling water, I will try it if I have problems with the pedals again. However, I’m really surprised that the cleaning worked only for an hour for you. I did that cleaning once when I bought the set a year ago, and it still works perfectly since then!
(My hihat will need some cleaning in the near future though.)
My rubber “foots” look quite like new, I couldn’t noticed any aging on them, but I applied some silicon spray which will further keep them in good condition.
For me, the problems did not caused by the aging rubber, bud the dust and dirt that got into the pedal and stack on the rubber, between the rubber and plastic side of the resistor.
The base cleaning can more-or-less be done from the outside, through its hole, without unscrewing anything, but I’m pretty sure that a good cleaning with disassembly should last much longer. I also disassembled the resistor itself, separated the two plastic layers and cleaned them with electric contact spray.
(Good quality rubber lasts for decades, specially if not exposed to direct sunlight (UV) and not dry out. I’m thinking about my 27 year old motorbike with dozens of rubber parts still original and flexible.)
cheers,
marci
September 30, 2014 at 4:02 pm |
Great post ! Please dó post the results of your boil-the-rubber trick.
Next time the volume of the bass pedal decreases, I might try it too !
June 3, 2015 at 6:09 pm |
Hi! Just giving some extra feedback!
(1) After using the boiling trick, the pedal worked fine for many months. I had some double kicks in the beginning (too much sensibility), but it got better after a month. Recently, I stayed away from the drums for about a month and, when I got back, the pedal was not working properly. I cleaned and greased without opening it and it came back to life. So it worked without maintenance for about nine months.
(2) Someone posted on youtube a video about the topic (www.youtube.com/watch?v=qp1lBpx525Q). Instead of putting into hot water, he applied petroleum jelly (vaseline) on the entire rubber piece, put it into a plastic bag and left it in a warm place for a day. This is another way of softening old rubber. Didn’t try it, but I bet it works.
(3) Just found out that the HD-1 pedal is a modified FD-8. Google “Roland FD-8 repair” and you will see some videos and posts about the same sensibility problem (and you will see the same rubber piece!). Some solutions involve changing the sensor, and some, softening the rubber piece.
October 21, 2014 at 6:39 pm |
Just thought I’d mention that I changed around the bass drum and
hi hat pedals on the hd1 set I use in schools,as the bass drum sensor had become weak. Bit fiddly but completed in 40 mins. Works great now. Also noticed the cleaning issue, worth doing for sure.
January 7, 2015 at 11:18 pm |
God bless you for this post. I was going crazy and refused to ship out my set. I stumbled across your post and have ordered the sensor. I pray it will be as easy of a replacement as you made it look. 🙂
February 25, 2015 at 12:25 am |
As Alexandre said: It is not necessary to disassemble the pedals to grease it. I did it because I only read the first parts of this blog, eager to get the problem fixed. Cleaned the pedal and greased the rubber with lithium grease spray, and the bass pedal worked like new. Did the same for the h-h, but this time vacuuming out the dust and spraying lithium grease with the narrow “extension tube” onto the rubber, without disassembling it. Done in 20 sec. And, Marcy, I agree, I don’t’ see any reason why this rubber should age, especially if it is regularly greased, so it doesn’t dry out.
March 4, 2015 at 12:25 pm |
Dear Mr. Bondy. I microwaved my HD-1 rubber bass drum part for too long and cooked it. 30 seconds works great – not longer. Where can I get a replacement rubber piece? Part #?
March 4, 2015 at 7:56 pm |
If Roland cannot provide the spare part, then I do not know of any other source.
April 1, 2015 at 7:28 pm |
Hi Mr Bondy
My son has an HD1 kit. The hi hat pedal has just given up, Would your fix be suitable for the UK (240v)? If so I shall order on of the replacement resistors you identify and have a go!
Thanks
David
April 4, 2015 at 6:14 pm |
David:
I was able to inspect an HD-1 recently, and the pressure-sensitive resistors on the kick side seem very similar to that on the high hat side. One way to test for compatibility would be for you to swap the wires between the kick and high hat, and see whether the kick then correctly functions as a high hat controller. I would measure the resistance of each, to make sure that they are comparable, and then attempt the same repair on the high hat side as I did on the kick side. Let us know how that works for you.
Jon
April 9, 2015 at 12:16 am |
Enfim http://trongdientu.com/mach-dien-cho-chan-kick-bass-trong-roland-hd1/a493853.html
April 27, 2015 at 11:34 am |
Dear Jon Bondy,
Thank you for posting this how to on fixing a Roland HD kick! Your instructions were awesome!! My kick has been fixed and I’m a happy girl. 🙂
Cheers!
Tara
October 31, 2015 at 3:45 am |
Works great. Replaced both resistors, but had to fine tune their placement for my desired sensitivity. Got the drum kit for cheap due to to this problem and now I’m smiling. Thanks Mr.
December 22, 2015 at 1:25 pm |
Hello everyone out there …
Hi Jon, i’ve followed this thread in the past, and i’ve got another question : Yesterday, i tried my HD 1 in our coverband. I linked it to a Mackie 250Watt speaker, through a mixing panel. Sounded quite good actually. There was one issue though : the floor tom hardly emitted any sound – a problem I don’t have when using headphones. The bass drum kicked *ss though, so it doesn’t seem to be about frequencies … Any ideas ?
Kind regards, and best wishes for the holidays from Belgium.
Piet
December 23, 2015 at 2:44 am |
Piet:
Very puzzling indeed! If you can hear the tom on the headphones, and if you used the headphone output to connect to the Mackie, then I am stumped. Maybe someone else will have a suggestion.
Jon
December 23, 2015 at 11:08 am |
Dear Piet,
Try to swap the cables of the floor tom and another pad.
You will then see if the problem is actually related to the floor tom pad or the cables/brain.
Try to switch drum kit and resetting the brain.
Try to set pad sensitivity as described on page 15 of the user manual. (http://lib.roland.co.jp/support/en/manuals/res/1810979/HD-1_r_e1.pdf)
Good luck!
Marci
December 24, 2015 at 6:44 pm |
WOW ! never saw this document about the pad sensitivity, looks great ! It will be a couple of weeks untill I use my set on a PA speaker again, but I will surely let you know how things went.
Thanks a lot !
Regards,
Piet
February 12, 2016 at 4:55 pm |
Any idea where I can buy replacement for rubber piece of hd1 kick pedal? Thanks
April 16, 2016 at 9:33 pm |
does anyone know where is can buy two new pedal heels? they are the rubber circles which screw into the heel of the pedal.. mine were thrown away by mistake!!!
November 19, 2016 at 10:59 pm |
the shipping was too expensive for the force -sensor so i found almost the sale on aliexpress with free shipping thanks for your help ;p https://fr.aliexpress.com/item/Smart-Electronics-FSR402-0-5-inch-pressure-sensor-resistance-stress-test-For-arduino-compatible-Force/32709761269.html?spm=2114.06010108.3.31.yBqwJg&ws_ab_test=searchweb0_0,searchweb201602_3_10065_10068_10084_10083_10080_10082_10081_10060_10061_10062_10056_10055_10037_10054_10059_10032_10078_10079_10077_10073_10100_10096_10070_10052_423_10050_10051_424,searchweb201603_1&btsid=954c6446-faed-49a9-b3f7-57ecd4402e28
September 6, 2017 at 6:27 pm |
I have this exact same problem, for this reason my HD1 has sat up in the loft not being used for some time, but I would love to use it again as it was amazing (I used it with BFD and got some huge sounds with a lot of dynamic range on the snare) instead I have just been using a regular keyboard from drums, while I can play it a million times faster and do some nifty double bass stuff, my timing is not as good, and the velocity is too constant on a keyboard.
ONE PROBLEM HOWEVER….my son dissembled the kit before I put it in storage, but he has lost every felt and screw for the cymbals!!! Does anyone know if these can be purchased anywhere, preferably for cheap? Roland say discontinued product, can’t help. Has anyone found any cheap alternatives that work well?
September 7, 2017 at 5:05 pm |
You can buy felt at craft stores and the crews should be pretty standard. Take some parts with you out to Ace Hardware and start sizing. It’s worth the effort. One of my bands still uses this kit for every live show we do. It just works so well for what we do. I’m not the drummer but I am the tech for this kit and I’ve even replaced a cymbal trigger to keep it working. The HD-1 is a killer little piece of kit!
September 7, 2017 at 5:06 pm |
screws not crews
October 6, 2017 at 12:24 pm |
[…] Fixing the Roland HD-1 Kick Pedal […]
October 6, 2017 at 5:22 pm |
What a great addition to this compendium of HD-1 tricks! Kudos!
October 6, 2017 at 5:24 pm
You have to click on the title of Paulos’ entry to see what he did. The full URL is here: http://pauloslee.com/2017/10/06/get-a-real-kick-pad-on-roland-hd-1/
October 19, 2019 at 1:47 pm |
Hi Jon,
I found your instructions after I discovered my old HD-1 to show the same symptoms you described here. I just ordered the same sensors and plan to follow your plan. I have one question though: How did/do the sensors stand the progress of time? Are they still any good after a few years of use?
I’d really like to hear from you! Thanks in advance.
October 19, 2019 at 5:34 pm |
I sold that drum kit within 6 months of fixing it, but I never heard back from the buyer, so it may have lasted quite a while. It’s not a hard fix, even if you need to do it every few years. Good luck!
October 25, 2019 at 12:37 pm |
I’ve just finished repairing the HD-1 as per your tutorial. It was very helpful. I managed to solder the new sensor to the cb and taped it to the floor plate. In spite of your tutorial, I used silver duct tape, but this proved to be a little too thick and caused some switch bounce (double hits with one kick). After replacing the tape with transparent household tape, everything sounded ok. Make sure you position the sensor exactly right, because it’s mostly sensitive in the middle. I had best results with the sensor one third over the white area of the previous one and two thirds over the striped area. After all that, I found that the necessary force to engage the sensor was still too high, probably because the rubber hammer had become too dry or rigid over time. For now, I have solved this by ducttaping two stacked 2×4 flat lego bricks to the underside of the aluminum pedal, just where it hits the rubber. Now all is fine, though it slightly compresses the dynamic range of the sensor.
October 25, 2019 at 5:50 pm
I’m glad that my article was helpful, and that you have added more information for the next person!
July 4, 2021 at 1:50 am |
[…] al sitio de Jon Bondy en https://jonbondy.wordpress.com/2012/06/24/fixing-the-roland-hd-1-kick-pedal/ para trucos y […]